It’s springtime, and it would be a good time to create a garden scene. You will use just basic shapes and the Pencil Tool in Adobe Illustrator. You will be surprised how many different objects you can create from a rectangle, ellipse and triangle!
1. Create Growing Carrots
Step 1
Press Control-N to create a New document.
First we are going to create a carrot. Using the Ellipse Tool (L), draw an ellipse (color R=245, G=128, B=37). Then take the Direct Selection Tool (A) and select the left and the right anchor points of the ellipse and move them upwards.
Step 2
Pick the Pencil Tool (N) and look at your Toolbar. Remove the fill color, select the stroke and set its color to R=221, G=93, B=5. Now simply draw lines like the ones on the image below.

Step 3
Increase the width of the stroke and change its color to R=141, G=139, B=0. Use the Pencil Tool (N) to draw the leaves of the carrot.
After that expand all the strokes without fills; this will help you to zoom in and out the carrot proportionally. To expand the strokes, select one of them, go to Select > Same > Fill color, then go to Object > Expand and press OK.

Step 4
Add a container for the carrots. Pick the Rectangle Tool (M) and create a rectangle. Keep it selected and go to Effect > Warp > Bulge. Adjust the options as shown on the image below.

Step 5
Place a carrot behind the flower pot: select the carrot, then right-click > Arrange > Send Backward.

Step 6
Make sure that your carrot is selected, press the Shift and Alt keys and simultaneously move the carrot to the right. Then simply click Control-D a few times to create a lot of carrots.

2. Create a Decorative Tree
Step 1
Before starting with the tree, verify that the stroke color is deleted, then select the fill and set its color to R=163, G=165, B=16.
Use the Ellipse Tool (L) to draw a circle. Then draw a second but smaller circle inside the first one with the color set to R=173, G=174, B=40.

Step 2
Now add a long rectangle using the Rectangle Tool (M). Set its color to R=114, G=108, B=1. That's the stem.

Step 3
Now it is time to create a flower pot. Start with a rectangle using the Rectangle Tool (M) and the color set to R=112, G=50, B=33. After that go to Effect > Warp > Bulge and adjust your wrap options like shown in the picture.

Step 4
Put all the parts together.

Step 5
Let's decorate the tree with flowers.
Take the Polygon Tool (M) (fill color R=230, G=227, B=208) and click on your art board. A dialogue window will appear where you need to set 6 sides and pressOK.
Go to Effect > Distort and Transform > Pucker and Bloat. Move the slider to 50%and press OK.

Step 6
Put a circle at the center (R=242, G=235, B=70). And there is your flower.

Step 7
Fill the tree with flowers by Copy-paste.

3. Create a Simple Fence
Step 1
Pick the Rectangle Tool (M) and draw a rectangle, set its color to (R=34, G=188, B=185).
Then take the Pen Tool (P) and add one anchor point as shown on the picture. Keep it selected and move it up.

Step 2
Press the Shift and Alt keys and simultaneously move the picket to the right. You will get two pickets. Now press Control-D and you will get three of them with the same distance.

Step 3
A slightly darker rectangle with fill color R=2, G=155, B=147 perpendicular to the pickets will finish the fence.

4. Create a Ladybug
Step 1
Draw an oval (R=238, G=53, B=36) with the Ellipse Tool (L).

Step 2
Copy and Paste this oval and change its fill color to black. After that take theConvert Anchor Point Tool (Shift-C) and simply click on the anchor points at the top and the bottom of the oval.

Step 3
Make the new shape very narrow and place it on top of the red oval. To place it exactly in the middle, select the two shapes at the same time and click theHorizontal Align Center and Vertical Align Center buttons on the Align panel.

Step 4
A black circle will be the head of the ladybug. To place the head behind the body, press Control-X and Control-B.

Step 5
Delete the fill color and set the stroke to color black. Make sure the Round Capbutton is checked on the Stroke panel. Now push the Arc Tool and draw the antennae of the insect.

Step 6
Distribute black circles with no stroke color over the body. Now you have a ladybug! Select all parts of the insect and Group them (right-click > Group).

Step 7
Put the ladybug on the fence.

5. Create a Birdhouse
Step 1
We will start with a light green rectangle (R=163, G=165, B=16) and a dark green circle (R=114, G=108, B=1).

Step 2
Now we will add a roof. Select the Polygon Tool button on the Toolbar and simply press on your art board. Choose 3 sides in the dialogue window and press OK. Set the color of the roof to R=141, G=139, B=0.

Step 3
Put the roof in place.

Step 4
All you need to do now is to create a long rectangle using the Rectangle Tool (M)with the fill color R=112, G=50, B=33.

6. Draw a Bird
Step 1
Start with the body. Take the Eyedropper Tool (I) and simply click on the fence to take the same blue color (or you could also choose the container where the carrots are growing).
Draw an oval by using the Ellipse Tool (L). After that take the Convert Anchor Point Tool (Shift-C) and simply click on the left and right anchor point of the oval.

Step 2
Keeping the new shape selected go to Effect > Distort and Transform > Twist. Enter 100 degrees in the Twist dialogue window and press OK. Expand the body (Object > Expand Appearance).

Step 3
Using the Direct Selection Tool (A) and by moving the anchor points make the created shape more rounded. Add a small eye - circle with fill color R=20, G=48, B=47.

Step 4
The bird will now get its legs. Take the Rectangle Tool (M) and draw two identical rectangles (color R=238, G=53, B=36). Send them to the back (right-click > Arrange > Send Backward).

Step 5
Keep the color of the legs and create an oval. Select the Convert Anchor Point Tool (Shift-C) click on the right anchor point of the oval. Then select the top and bottom anchor points of the oval using the Direct Selection Tool (A). Move them to the left.

Step 6
Put the wing in place.

7. Place the Bird Over the Birdhouse
Select the whole bird and Group it (right-click > Group), place it over the birdhouse and send the bird to the back (right-click > Arrange > Send Backward).

8. Create a Plant
Step 1
Let’s create a flower pot. Make the fill color brown (R=112, G=50, B=33) and draw a rectangle. Then go to Effect > Warp > Bulge and adjust the warp options as shown on the image below.

Step 2
Add a small horizontal rectangle of the same color at the top.

Step 3
Creating a leaf starting from a green oval. You need to get sharp corners with the help of the Convert Anchor Point Tool (Shift-C).

Step 4
Using the Line Segment Tool (\) draw a line exactly in the middle of the leaf. Go to the Pathfinder panel and press the Divide button. You will get two halves of the leaf. Select one half using the Direct Selection Tool (A) and make it darker (R=141, G=139, B=0).

Step 5
Create two leaves (Copy-paste) and draw a stalk using the Arc Tool (stroke colorR=124, G=118, B=1).

Step 6
Place the plant in the flower pot.

9. Create a Watering Can
Step 1
Using the Eyedropper Tool (I) take the blue color of the bird you created before and draw a rectangle. Then go to Effect > Warp > Bulge with the Wrap Options shown below.

Step 2
Remove the fill color and make the stroke color the same blue. Increase the stroke on the Stroke panel and draw a circle (for a nice round circle you need to hold theShift button). That’s the handle.

Step 3
Now remove the stroke color and make the fill color blue again. Select the Polygon Tool and simply click on your art board. Set 3 sides in the new window and pressOK. After that use the Direct Selection Tool (A) and change the shape of the triangle:

Step 4
Place it on the top of the watering can.

Step 5
Create a blue rectangle once more and make it narrower at the spout.

Step 6
A blue triangle turned upside down will serve as a sprinkler.

Step 7
Do you remember how to create a flower? You may also just take one of those you made for the decorative tree.

Step 8
Decorate the watering can with the flower.

10. Create the Gardening Gloves
Step 1
Assemble three shapes as shown on the image. Fill color is R=163, G=165, B=16.

Step 2
Create one more copy of the mitten and make it darker (R=141, G=139, B=0). Place it behind the first one.

11. Create a Seed Packet
Step 1
To create a seed packet you will need a green rectangle R=163, G=165, B=16. Make one more copy of it (Control-C, Control-F). Then take the Pen Tool (P) and add one anchor point at the bottom part of the green rectangle. When you are done, pick the Delete Anchor Point Tool (-) and remove two anchor points at the lower edges of the rectangle to create a triangle (see picture below). Shift the remaining anchor point at the tip of the triangle upwards.

Step 2
Now get a copy of the created triangle (Control-C, Control-B). Stretch the new copy down and set its color to R=141, G=139, B=0.

Step 3
Pick your favorite font and simply type "Seeds" on the packet. The color used for the text is R=112, G=50, B=33.

Step 4
Create a single seed. Draw an oval using the Ellipse Tool (L) (color R=226, G=213, B=45). Make a copy of it (Control-C, Control-F) and set its color to R=242, G=235, B=70. Then take the Delete Anchor Point Tool (-) and delete the anchor point, marked on the image below.

Step 5
Copy the single seed to make three of them. Place on the packet.

12. Create a Gardening Trowel
Step 1
Start by creating a handle with the Rounded Rectangle Tool, create two rectangles one in light orange (R=245, G=128, B=37) and one in dark orange (R=219, G=101, B=22).

Step 2
Add one more rounded rectangle with blue fill color (R=2, G=155, B=147).

Step 3
Now add the main part of the trowel based on a blue oval (R=34, G=188, B=185). You need to select the left and right anchor points using the Direct Selection Tool (A). Move them downwards.

Step 4
Merge all the parts and group them.

13. Create a Gardening Fork
Step 1
Take the elements you made in the Step 12.2 and draw one more rounded rectangle like the one you can see in the picture below. Set its color to R=34, G=188, B=185.

Step 2
Add three identical rounded rectangles.

Step 3
Keep the three newly created rectangles selected and go to Effect > Warp > Arc. Adjust the wrap options.

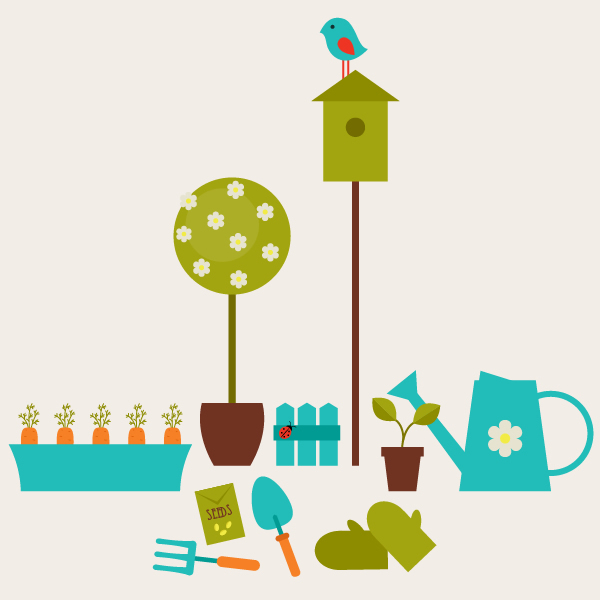
14. Put Them All Together
Step 1
You may bring all the parts you created together. See how it looks!

Step 2
Finally we will add a background. Create a square 600px on each side using theRectangle Tool (M). Set the fill color to R=242, G=237, B=231 and send the rectangle to the back.

Conclusion
Great job! You just created a sweet little garden scene. Print it out - and you will have spring greetings. Using the separate objects you can create garden icons. Hope you learned some new tricks which you can use in your future art projects.

 I've been a vector artist and microstock illustrator since 2009. Drawing is a big pleasure of mine, I draw a lot and often. My style is cartooning, decoupage and childish. Writing for Tuts+ is a chance to share with others what I can do and what I love. Please visit my website if you want my free vector images
No hay comentarios:
Publicar un comentario